Saturday, September 24, 2011

September Birthdays

I know far too many people born in September, which lead to a couple of weeks of mad sewing. I'm not sure how it happened, but I swear, the birthdays crept up on me! 

This month I made a Feliz Cumpleanos banner (not picture -- I didn't have time to take a photo before I mailed it off), two Happy Birthday banners, a set of mustaches, and one last gift that has not quite made it out of the door, so I won't spill the secret.

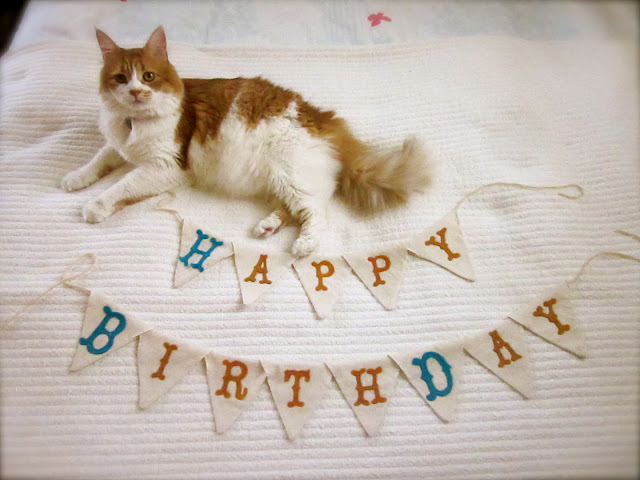
Zissou, also a September birthday, is never camera shy. I kept fighting with him to move so that I could snap a couple of photos, but he wouldn't have it. Instead fighting him, I let him have his way, and I ended up with this adorable photo. 


Here's an up close photo of the Happy Birthday banner. I made two of these, much smaller than my original banners, and with a new font, which I'm liking more than the bolded American Typewriter I normally use. 


The letters are a little more work, but I really like how they turned out. I'm hoping to head out to the fabric store sometime this weekend to pick up some materials for my Christmas banner.


And, as a special gift for my friend and coworker, I made this set of mustaches! The hardest part making these was deciding what kind of mustache I wanted to make. I'm not exactly happy with who they look (there's a little messiness where the douwel was hot glued in), but I started cutting and crafting without a plan. Now I know for the next time. Does anyone want a set of these?


I have one last gift that I made for my sister, who's birthday is next week, but I'll post that after the 29th. 


Happy Birthday, everyone!

Monday, September 5, 2011

Labor Day Fun: prepping for new projects

It's fitting that on Labor Day I finally have the time and energy to begin prepping for some new projects. Check out the fabrics I bought this morning!


So with an idea in mind, and remembering the wonderful colors and shapes that I was inspired by on my visit to the Monterrey Bay Aquarium and the beautiful beaches, I headed over to my favorite brick and mortar fabric store, Stonemountain and Daughter. The fabrics above are all for a new quilt I'll be working on. Unfortunately, this will be another long project that will take me weeks, if not months to complete. What a bummer, but a great lesson in patience. I'll try and post updates on my progress to keep me motivated; it'll give me a sense of accountability!

I've also begun prepping my materials for Christmas gifts (yes, already)! Did you read that lovely sisters of mine? I'm already getting started on your Christmas gifts! I'll be spending a lot of my evenings working with my hands, needles and thread. I can't express how much I'm looking forward to being creatively active again. And since I don't wan to spoil the Christmas surprise,  I'll refrain from posting images.

And for now, I'm off to finish cooking my mom's famous Mexican rice. 

Wednesday, August 3, 2011

Birthday gifts


Wow. I can't believe it's been a whole month since I last updated! There have been so many evenings that I've wanted to write, but just didn't have the energy to put together a new entry, or to even work on a project. I recently started a new job, and have spent the last month adjusting to a new schedule and attempting to manage my energy. I'm only now gaining the upper hand!

On a positive project note, I did finish up a birthday gift for my mother-in-law. Remember the Patchwork Star I made in June? Well, I spent a good two weeks sewing the star onto a piece of muslin. When it was finally finished, Joel stretched it on a piece of matt board, and framed it. It took much longer than I initially planned, but I made my deadline, and my Mum received her gift on time. And, she loved it!

I'm finding myself drawn more and more to quilting! Maybe it's because it's one of the few projects I can work on while plopped on the couch and watching TV?

Well, I have a quilt planned out (more about that soon), and can't wait to go fabric shopping this weekend. I promise I won't neglect this blog as much.


Tuesday, July 5, 2011

Decorating

Joel and I have done a good job at decorating our living room and kitchen in the 10 months that we've lived in our apartment, but our bedroom has been severely neglected. Well, that has finally changed! We took advantage of our weekend and finished up some projects, like matting some prints and framing others.

Even though our kitchen is set up nicely, we still felt like something was missing, and Joel suggested putting up a chalkboard in our kitchen to jot down notes, lists, etc. And instead of buying one, we decided to make one! We picked up a piece of MDF that was way too long and had them cut it down into two pieces: one for the kitchen like we originally planned, and the second for the bedroom since we had the left over piece.


Once we got home, we prepped our work station (a picnic table in the backyard), and started by applying two coats of primer, and called it a day. The next morning we applied a coat of the chalkboard paint, which has a drying time of 30 minutes between coats. Throughout the day we periodically applied coats of paint to the board until the sun went down and the pieces were mostly dry. And the next morning once the pieces were fully dry, Joel attached some screws and the chalkboards ready to hang. And this is what we now have up in our room:


The yellow print of the owl was a gift from my sister, which we matted and re-framed. The embroidered bird is the one I made a couple of months ago and finally got around to mounting on some mat board and framed, and of course the new chalkboard! Joel added the bunch of lavender as a surprise, which I absolutely love because it reminds me of the hotel we stayed in on our honeymoon that had bunches of lavender placed throughout the hotel.

On the other wall in the room we put up the quilted honeycomb that I blogged about here. The room feels complete, and definitely more homey now. I'll try and post photos of the rest of the house soon!


Sunday, July 3, 2011

finished Quilted Library of Babel

Two straight weeks of sewing, 1 1/2 yards of fabric, and 62 hexagons later...

I originally planned to do some Sashiko embroidery, but instead sewed a few bees to complete the honeycomb/beehive look. Once I was finished, I stitched it onto a piece of canvas, and Joel stretched it onto some stretcher bars for me.


And now this 16" x 40" piece of quilted art is hanging in our bedroom. I'm so happy with how it turned out! It feels great to have finished the project, but I already have another one lined up! My hands just can't sit still for too long.

Happy 4th of July weekend!

Friday, July 1, 2011

Inspiration

I wanted to share some of the inspiration for the Quilted Library of Babel project I've been working on. For this project I've drawn on a short story, a favorite movie and my favorite color palette.

Library of Babel/La Biblioteca de Babel

The name itself references Jorge Luis Borges' short story, The Library of Babel (Biblioteca de Babel), in which he describes the library as a universe that consists of an enormous expanse of interlocking hexagonal rooms, each of which contains the bare necessities for human survival—and four walls of bookshelves. It's one of my favorite stories, and I've been fascinated by it for years.


Set in the 1940's, Espiritu de la colmena is a film by Spanish director Victor Erice. It's eerie, quiet and just beautiful to watch. I first saw this film for a Spanish film class in graduate school, and instantly fell in love with it. One theme, that is carried out throughout the entire movie, is that of the beehive. The image of the honeycomb is seen various times in the movie -- it's very hard to miss! Not only is this movie visually stunning, but it's an amazing critique of post-Spanish civil war society and the effects of dictatorship and war on a society, and it's individuals.


Papered Pom set from BHLDN

A couple of years ago when my husband and I were planning our wedding, we drew a lot of inspiration from our love of books, and the stylish items and decor at Anthropologie stores. Above is a papered pom set from Anthropologie's wedding line, BHLDN, that is pretty spot on to the color scheme I chose for my project. It's also very similar to the colors at our wedding -- very soft and warm tones. If only BHLDN existed when I got married. Side note: We actually had tissue paper flowers/poms, that were made with the help of my awesome coworkers, decorating the backdrop for our ceremony.

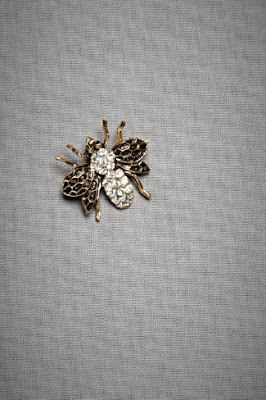
Isn't this brooch beautiful? Couldn't pass posting this little guy.

Honeybee Brooch from BHLDN


Well, there you have it! What things bring inspiration to your projects?

Thursday, June 30, 2011

Quilted Library of Babel

Here's a sneak peek at what I've been working on for the last week and a half:

from this:


to this:


and finally, this:


Just a few more touches before I can reveal the whole project. Stay tuned!

Friday, June 24, 2011

Temporary Upgrade?

I really wanted to update this week with a new Therefore I am, but unfortunately I was busy with jury duty this week, and have started another project that is a bit time consuming. So instead, let's talk about my temporary upgrade!


Left: the Mini Ultra sewing machine I bought nearly 6 years ago. It's a total trooper.
Right: My Mom's "fancy" brother sewing machine.

When I was down in Los Angeles visiting my folks, I took full advantage of the sewing machine my Mom bought a few months ago, and sewed with it nearly every night. It was amazing. I couldn't believe how smooth and quiet it sewed.

My Mini ultra has a mere 10 different stitches. In the past, these were enough as I mainly did very basic sewing. My Mom's machine? It has 70, yes 70 different stitches! It also comes with 10 different feet. Who knew you would need that many? Not to mention all sort of other features that make this a dream to sew with. I'm very sad that I have to return the machine to my Mom when I see her in August! Ahh...but until then, imagine all the wonderful things I can and plan to sew? This makes me happy.

Happy Friday, everyone!


Sunday, June 19, 2011

Happy Father's Day!

I made this banner in honor of my Dad, who really is the #1 Dad:


I am so grateful for all of his love and support; for everything he sacrificed so that my siblings and I had everything we needed growing up. I love you, Dad!

Friday, June 17, 2011

Fabric fun!

I recently spent a couple of weeks visiting my family in Los Angeles, and came back with some new fabrics. I'm lucky that my parents live very close to Los Angeles' fashion district, where there's tons of fabric stores. I only checked out Michael Levine's, which is amazing, but not very cheap. Had I planned better, I would have had cash on hand and spent the morning checking out other stores, but that's okay. So what did I bring back to Oakland?


Fabrics 1, 4, 5 and 9 were stashed away in a sewing bin I left in my old room. I bought these years ago, when I was exploring sewing. I know I had more, but I donated a bunch of scraps to Inner-City Arts, an arts education non-profit that I worked for.

Fabrics 2 and 3 I found at Saint Vincent de Paul thrift store. It's the first time I've picked up fabric from a thrift store; I normally buy vintage dresses, shirts or furniture. Unfortunately for me, the clothes selection was just so-so.

Fabrics 6, 7 and 8 I bought at Michael Levine's and I already know exactly what I'm going to make with them.

Needless to say, I'm pretty excited that my stash is growing and growing. I also have a few coupons to Joann's, which I'm hoping to use this weekend (before they expire!) and a gift card for Stonemountain & Daughter, a local fabric store in Berkeley. This makes me very happy.


Wednesday, June 15, 2011

therefore I am: Love

Today is my Mom's birthday, and as a gift I embroidered the following:


My Mom is such a loving and amazing woman. I feel so blessed to have her as a role model. So, this gift is just a small token of my gratitude for everything she's done for me and my siblings. Happy Birthday, Mom!

Monday, June 13, 2011

1, 2, 3 Sew

Ellen Luckett Baker from The Long Thread has a neat book out called 1, 2, 3 Sew. Below is a trailer for her book. I can't wait to check out a copy of it, where she presents projects in groups of three, and each projects build on skills learned in the one before.

Check out the super cute trailer!

Thursday, June 9, 2011

Patchwork Star hanging


For my birthday a few months back, I used some of my birthday gift money to buy myself the
Martha Stewart's Encyclopedia of Sewing and fabrics (Thank you, family!), which is full of basic techniques for sewing by machine or hand, and lots of other craft techniques and tips. The second half of the book is full of wonderful projects with detailed (and sometimes very confusing) instructions. I already bookmarked a ton of projects, but have decided to start with the Star pattern patchwork.

The instructions in the book are for a 24in finished star, but I thought that was a bit large (imagine the size of frame you'd need to buy for it?) and decided on making a 12in star. I used scraps from 4 different fabrics and interfacing I had left over from the gathered clutch.

The very first step is to apply the interfacing to the back of the fabrics. Here's a helpful tip for ironing on your interfacing: make sure you have the textured side DOWN. It's the adhesive side, and I made the mistake of ironing the interfacing to my damp towel. No worries though, I peeled it off, and ironed it textured side down to the fabric. Phew.

Next, comes the math and ruler part. The instructions call for drawing vertical lines 2 inches apart, and then another set of lines at 45 degrees, two inches apart. I have a hard time wrapping my head around this sort of stuff, so I enlisted Joel's help to mark up the back of the fabrics (the side with the interfacing). You may notice in the photo below that the interfacing is not one solid piece. I made use of all the scraps I had, and just made sure the seams were overlapped when ironing it on.


I carefully began cutting the diamonds with my rotary cutter.


Once your diamond pieces are all cut out, play around with them until you decide on a pattern you like. Below is the one I chose. You can always use more fabrics, but I thought I'd keep it simple and use an even number of fabrics (plus, these are the ones I had handy). I ended up changing the pattern around because I unknowingly flipped a couple of pieces when sewing, but that's okay -- you're allowed to change your mind along the way!


When sewing the individual pieces together, make sure that the right sides are facing each other (IE: the sides of the fabric without the interfacing).


I began by sewing the center pieces together, and then working outwards.


Initially, I sewed an entire star out of 8 diamonds, but I was having a difficult time sewing the additional diamonds to the core star. I ended up taking apart the center seam that joined the two halves together. Once I did this, I quickly basted diamonds to each of the halves and then ran the whole thing through the machine.


And when I was done, I had this:


I still need to sew the Patchwork Star to another piece of fabric before I frame it. Another option is to float it in a frame as is. Now that I've got this first version under my belt, I'm thinking of how to modify, modernize and personalize it. Look out for a different version soon!

Sunday, June 5, 2011

therefore I am: Was

This week, I embroidered the following for my dear friend, V.


I was, therefore I am pays homage to a fad where we were obsessed with existential paradoxes. One evening my husband asked, "If you buy something at IKEA in the 'As-IS' section, do you then go home and tell your wife you bought it 'As-WAS'?" This was like Pandora's box being flung wide open. Fun times!

Wednesday, June 1, 2011

Zucchini Bread Cakes

I baked these Zucchini Bread Cakes to encourage my sister, and for her to munch on while preparing for finals. Go Michi!

Shredded zucchini...


everything in the bowl...


and done!


Sunday, May 29, 2011

therefore I am: Sew

Cogito, ergo sum is probably one of the few concepts that I remember from my college philosophy class. I loved Descartes' phrase so much that I made myself a tshirt proudly exclaiming "cogito, ergo sum", and wore it religiously. I probably would still be wearing it now if I hadn't dropped a piece of my eskimo pie on the shirt. (I could never get the chocolate stain out of it.)

Remembering my love for Descartes, I created the following:


Tuesday, May 24, 2011

Colors


A gift I received from JoAnn, my Mum, some years ago.

Sunday, May 22, 2011

Gathered clutch by Noodlehead


A few weeks ago I ran into the Gathered Clutch tutorial by Noodlehead and thought that it could be a great gift to make for my sisters. But first, I had to make a test run. With the clutch in mind, I headed to my nearest JoAnn's to pick out some fabrics. Shopping for fabric for any project is usually one of the most difficult steps for me. There are just too many options!

With all my fabrics cut out according to the tutorial, I was ready to start.


So what materials did I end up using?
  1. Of the grey fabric: 1 piece 5.5" h x 9" w; 1 piece 5.5" h x 13"w
  2. The plaid fabric: 4"h x 9" w
  3. Vine & flower fabric: 2 pieces 5.5"h x 9"w
  4. Interfacing: 4 pieces 5.5"h x 9"w
  5. For zipper covers: 2 pieces 1.5"h x 2.5" w
  6. One 8" zipper.
She suggests buying 1/4 of a yard of the outside and lining fabrics, but I bought a little more in case I made a mistake.

I must know myself really well, because the extra fabric came in hand when I gathered the front of my clutch too much, setting off an entire series of missteps that lead to a disfigured and lopsided clutch. Sigh. Well, I decided to start from scratch and salvaged the zipper from the epic fail that was my first attempt.

Okay, let's start this again. With my fabrics re-cut, I followed Noodlehead's instructions and began sewing the plaid fabric for the band. Then I sewed two lines on the outside fabric to create the gathered front. This is where on my first attempt things began to go awry.

Hoping to avoid making the same mistakes, I decided to mark out the lines, 1 inch apart, before I sewed them. It was easier to sew a straight line after I marked it. The front piece is cut 4 inches wider than the back to account for the gathering, which works out perfectly. However, after scrunching I lost my straight edges. No worries! I just trimmed them down about an inch and cut the other pieces to the exact same size. If you decide to try this tutorial out, I'd suggest adding about 1" or 1.5" to the height of the piece to account for the gathering.

Once the front piece is gathered and has a total width of 9 inches, pin and sew the band over the center, covering the stitches. Then iron the interfacing to the back. I also added interfacing to the lining pieces to make the clutch sturdier. It made a big difference in the end product.


So now that all the pieces are ready, it's time to assemble the clutch! Following Noodlehead's instructions, I began sewing the exterior fabric (FYI: the RIGHT sides of the fabrics should be facing each other, so that it looks like you're sewing the reverse side of your clutch). As the tutorial warns you: do not sew over the zipper covers!


The first time, I didn't heed the warning and it was a mess. After looking closely at this photo, I figured out that the zipper covers need to be folded over to the lining side.

I continued to sew all around the fabric pieces, leaving 3-4" inches open in the lining so that I could turn the clutch right side out.


And here's the finished product!


The second attempt was so much easier that I am ready to make more! So, don't be surprised if you see more of this clutch on here.


Saturday, May 21, 2011

I wonder...

What will these pieces become??


We'll find out soon enough!

Welcome!

At the beginning of this year one of my friends promised a handmade gift to the first five people who commented on her status update. The catch? Each person then had to re-post the status, offering to make a handmade gift to 5 other people. I only got one response on my status, but I was inspired to create wonderful things with my own hands. And thus, I sew, therefore I am was born.

I'm kind of a novice at the whole hand making goods thing. In the past, I've found myself making plush dolls for my friends, or sewing up tote bags without a plan, and even attempting to make a dress or two without knowing how to read a pattern. Some items turned out better than others, but I always enjoyed the process of making things. Unfortunately, my lack of patience occasionally made the experiences less than enjoyable.

Having grown wiser and more patient since those early sewing endeavors, I'm excited to share my journey through new projects with you!